Safety doesn’t happen by accident—it’s built through consistent communication. And nowhere is that more evident than in the daily or weekly toolbox talk. These short, focused safety meetings are critical for reinforcing protocols, addressing hazards, and keeping teams aligned. But without structure, they lose impact. That’s where a toolbox talks template Word file becomes essential: a reusable, editable format that streamlines preparation and ensures nothing is overlooked.
For safety managers, supervisors, and team leads, the challenge isn’t just holding these meetings—it’s making them effective, documented, and compliant. A well-designed Word template removes the friction. It provides consistency, saves time, and supports legal and safety standards. This guide delivers not just a conceptual understanding but a practical, real-world approach to building and using a toolbox talks template in Microsoft Word.
Why a Word-Based Toolbox Talks Template Works Best
Microsoft Word remains the go-to document tool across industries—especially in construction, manufacturing, and field services. Unlike web-based forms or apps, Word templates are:
- Offline accessible – No internet needed on job sites
- Compatible with legacy systems – Opens on nearly any device
- Easy to customize – No technical skills required
- Print-ready – Ideal for sign-in sheets and physical records
While digital platforms offer automation, a Word template strikes the right balance between simplicity and functionality. It integrates into existing workflows without requiring training or new software.
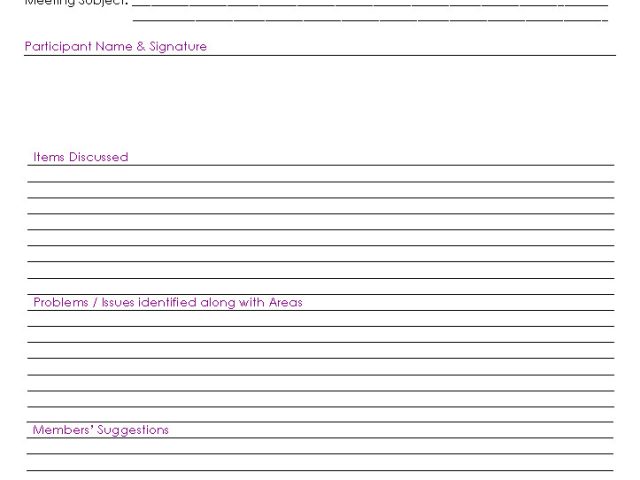
A strong toolbox talks template in Word includes: - Meeting topic and date - Attendee sign-in section - Discussion points - Hazard identification - Action items - Supervisor signature
This structure ensures every session is documented properly—protecting both workers and the organization in case of audits or incidents.
Core Components of an Effective Toolbox Talks Template
A generic template won’t cut it. To be useful, your Word document must reflect real-world conditions and compliance needs. Here are the non-negotiable elements:
#### 1. Header with Project & Session Details Include: - Company name and logo - Project name/location - Date and time - Topic of discussion (e.g., “Fall Protection,” “Electrical Safety”) - Facilitator name and role
This creates immediate context and supports record-keeping.
#### 2. Attendee Sign-In Sheet A table with columns for: - Name - Signature - Employee ID (optional) - Trade or crew
Pro Tip: Use Word’s table feature with pre-sized rows (8–10 lines). Avoid text boxes—they shift during printing.
#### 3. Discussion Outline Break this into bullet points covering: - Hazard(s) addressed – Be specific. Instead of “slips and trips,” say “wet concrete surfaces near formwork.” - Control measures – e.g., “Use absorbent mats,” “Mark hazard zones with tape.” - Relevant PPE – List required gear and inspection steps. - Emergency procedures – What to do if something goes wrong.
This section should prompt dialogue, not just reading.
#### 4. Site-Specific Notes Section A blank text box or paragraph space for: - Observations from the field - Near-misses reported - Changes in conditions
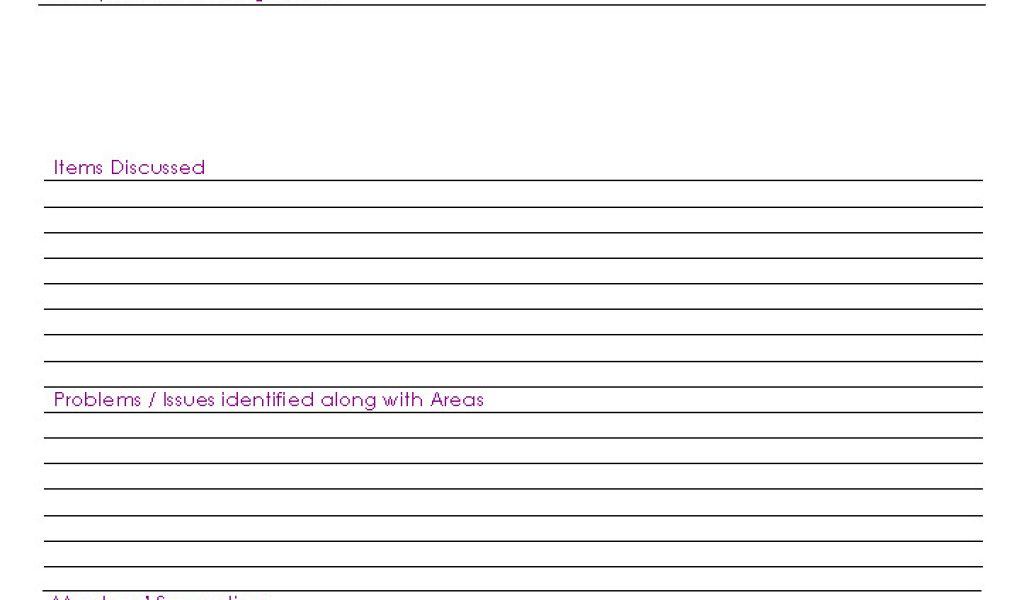
This turns a generic template into a living document.
#### 5. Sign-Off Area Final box for: - Supervisor signature - Date - “Next review date” or “Follow-up scheduled”
This closes the loop and reinforces accountability.
Common Mistakes That Undermine Toolbox Talks
Even with a great template, many teams miss the mark. Avoid these pitfalls:
#### Mistake 1: Copy-Paste Topics Without Customization Using the same “Ladder Safety” talk every quarter, word-for-word, breeds complacency. Update examples based on current tasks—e.g., “Using extension ladders on uneven ground during exterior cladding.”
#### Mistake 2: Skipping Attendance Verification No signatures = no proof. OSHA and insurers require documented participation. A template with a clear sign-in table prevents gaps.
#### Mistake 3: Holding Talks in the Office, Not on Site Toolbox talks are most effective at the point of work. A template should be printed and brought to the location where the hazard exists.
#### Mistake 4: One-Person Monologue If the supervisor does all the talking, engagement drops. Design your template to prompt questions—e.g., “Has anyone seen this hazard this week?”
#### Mistake 5: Failing to Archive Records Old talks get tossed or lost. Save each completed Word doc in a dated folder (e.g., “Toolbox Talks – Q3 – Roofing Phase”). Cloud-synced folders (OneDrive, SharePoint) help with access and backup.
How to Customize Your Toolbox Talks Template in Word
Start with a clean document. Here’s a step-by-step workflow:
- Set Margins and Font
- Use 1" margins, Calibri or Arial 11pt for readability.
- Insert a Header
- Add company logo (insert > image) and project name. Use Word’s header function so it appears on every page.
- Create the Sign-In Table
- Insert a 4-column, 10-row table. Label: Name | Signature | Employee ID | Trade. Tip: Right-click > Table Properties > Text wrapping: None, to prevent layout breaks.
- Add Bullet Sections
- Use “Heading 2” styles for main sections (e.g., “Discussion Points”). For bullets, use Word’s built-in bullet list to ensure consistency.
- Include a Hazard Image (Optional)
- In high-risk topics (e.g., confined spaces), insert a small, clear image next to the hazard description. This improves retention.
- Lock the Template (Optional)
- Save as “.dotx” (Word Template) to prevent accidental edits to the structure. Users can “Save As” a new .docx for each session.
- Add Company Safety Policy Reference
- At the bottom, include a line: “This discussion aligns with [Company Safety Manual], Section X.X.”
5 Free & Reliable Toolbox Talks Template Sources (Word Format)
Not everyone has time to build from scratch. Here are trusted sources offering downloadable Word templates:
| Source | Template Quality | Best For | Notes |
|---|---|---|---|
| OSHA.gov | High | Compliance-focused teams | Official, minimal design, fully editable |
| NEBOSH Community | High | International standards | Includes risk rating fields |
| SafetyCulture (iAuditor) | Medium-High | Hybrid digital/print users | Free Word downloads after email signup |
| HSE UK Resources | High | Construction & utilities | Clear, concise, bilingual options |
| Template.net | Medium | Quick turnaround | Some templates require paid access |
Always verify the template allows editing and doesn’t contain macros or watermarks. Prefer government or industry body sites for reliability.
Integrating the Template Into Your Workflow
A template only works if it’s used consistently. Embed it in your safety rhythm:
- Schedule talks weekly or per phase change – e.g., before starting excavation or hot work.
- Assign topic ownership – Rotate facilitators to improve engagement.
- Link to JSA (Job Safety Analysis) – Use the same hazards and controls for continuity.
- Review past talks monthly – Look for recurring issues (e.g., PPE non-compliance).
- Print and post summaries – Pin key points near break rooms or tool cribs.
Example: On a commercial build, the crew uses a Word template every Monday at 7:15 AM on the first-floor slab. The talk covers that week’s high-risk tasks. Completed templates are scanned and uploaded to the project SharePoint by Tuesday noon. The safety manager reviews them and flags trends—like three talks mentioning missing hard hats—then schedules retraining.
Making the Template Adaptable Without Losing Control
Flexibility matters. A rigid template becomes a box-ticking exercise. Build in smart adaptability:
- Use text highlighting (yellow background) to mark sections requiring updates—e.g., “Insert current weather conditions affecting work.”
- Add footnotes with topic variations:
- For roofing: Emphasize fall arrest anchors. For interiors: Focus on ladder stability on finished floors.
- Create topic-specific versions (e.g., “Toolbox Talk – Confined Space – Word Template”) but keep the same base format.
This ensures consistency while allowing for relevance.
Final Tips for Maximum Impact
- Keep talks under 10 minutes – Respect crew time.
- Use the template as a guide, not a script – Encourage discussion.
- Revisit the same topic quarterly – Reinforce learning.
- Translate if needed – Use Word’s language tools for multilingual crews.
- Pair with visual aids – Bring a damaged harness to show during PPE talks.
A toolbox talks template in Word isn’t just paperwork—it’s a frontline defense against incidents. When designed well and used consistently, it becomes a living part of your safety culture.
Download one today, customize it for your team, and run your next talk with confidence.
FAQ
Where can I get a free toolbox talks template in Word? OSHA, HSE UK, and SafetyCulture offer free, downloadable Word templates. Always verify editing rights and compatibility.
How often should toolbox talks be held? Weekly is standard, but increase frequency during high-risk tasks or after an incident.
Do toolbox talks need to be signed? Yes. Signatures prove attendance and understanding, which is crucial for compliance and liability protection.
Can I use the same template for all topics? Yes—use a universal format but customize the discussion points, hazards, and examples for each topic.
Should toolbox talks be stored digitally or on paper? Keep both if possible. Digital files are easier to archive and search; printed copies support immediate site use.
How long should a toolbox talk last? Aim for 5–10 minutes. Focus on one clear topic to maintain engagement.
Who should lead a toolbox talk? Supervisors, foremen, or safety officers. Rotate among qualified team members to increase involvement.
FAQ
What should you look for in Toolbox Talks Template Word: Free Download & Best Practices? Focus on relevance, practical value, and how well the solution matches real user intent.
Is Toolbox Talks Template Word: Free Download & Best Practices suitable for beginners? That depends on the workflow, but a clear step-by-step approach usually makes it easier to start.
How do you compare options around Toolbox Talks Template Word: Free Download & Best Practices? Compare features, trust signals, limitations, pricing, and ease of implementation.
What mistakes should you avoid? Avoid generic choices, weak validation, and decisions based only on marketing claims.
What is the next best step? Shortlist the most relevant options, validate them quickly, and refine from real-world results.


/cdn.vox-cdn.com/uploads/chorus_image/image/70269281/112379621.0.jpg)


